Examples
The IDK ships with example applications that demonstrate how to combine its services into working systems. These are intended as reference implementations you can study, run locally, and adapt for your own deployments.
Everything under examples/ is a didactic, working demo of the IDK wiring. It is not a production-ready stack. Auth is disabled on the internal REST ports, signing keys are generated locally with hardcoded passwords, the OAuth2 AS accepts any public client, VCT metadata is served as static files instead of from a blob store, and there is no real identity provider behind the login form. Treat the code as a reference for how the pieces fit together, and build your own deployment on top of the IDK services directly.
OID4VC Demo
The examples/oid4vc directory contains a demo application that ties together three IDK services into a complete credential issuance and verification flow:
- OID4VCI Issuer: creates credential offers and issues credentials to holders
- OID4VP Verifier: creates authorization requests and verifies presented credentials
- OAuth2 Authorization Server: handles the authorization code flow with PKCE
Screenshots
Click any thumbnail to open the full-size screenshot.
Prerequisites
Before running the demo, make sure you have the following installed:
- JDK 17 or later: the IDK targets Java 17+. OpenJDK distributions like Eclipse Temurin and Amazon Corretto both work.
- Gradle: included via the Gradle wrapper (
gradlew/gradlew.bat) in the repository root, so you do not need a separate Gradle installation. - Node.js 18+: required for building the React frontend. Install it from nodejs.org or use a version manager like
nvm. - A modern browser: Chrome, Firefox, Safari, or Edge.
Verify your environment:
java -version    # Should print 17 or higher
node -v          # Should print v18.x or later
Project Structure
examples/oid4vc/
  webapp/
    server/        # Ktor web application (API + React SPA serving)
    client/        # React SPA source
  services/
    docker-compose.yaml         # Full environment definition
    Caddyfile                   # Reverse proxy routing rules
    Dockerfile.service          # Shared service image definition
    start.sh / start.bat        # Pulls published sphereon/idk-* images and runs them
    start-dev.sh / start-dev.bat  # Builds fat JARs + images from local source
    build-images.sh / .bat      # Builds Docker images without starting anything
    publish-images.sh / .bat    # Pushes images to a registry (with SNAPSHOT/dirty guards)
    lib/                        # Shared helpers (base-URL, VCT templating, keystore gen) in bash + PowerShell
    config/                     # Per-service YAML configuration
    keystores/                  # Generated PKCS12 keystores (created on first start)
    jars/                       # Fat JARs produced by Gradle (dev mode only)
    vct/                        # SD-JWT VC type metadata templates
    well-known/                 # Static well-known metadata served by Caddy
    assets/                     # Static assets (logos, backgrounds) served by Caddy
    postman/                    # Postman collection for manual testing
Architecture
The demo runs as a set of Docker containers behind a Caddy reverse proxy. Each IDK service runs in its own container, and Caddy routes requests to the right service based on the URL path.
| Container | Image | Role |
|---|---|---|
| Caddy | caddy:2-alpine | Reverse proxy on port 8080. Routes /oid4vci/* to the issuer, /oid4vp/* to the verifier, /.well-known/* to the appropriate service, /webapp/* to the web app, and everything else to the OAuth2 AS. Also serves static VCT metadata and assets. |
| Webapp | sphereon/idk-oid4vc-webapp | Ktor web application serving the React SPA and providing API endpoints for the frontend. |
| OAuth2 AS | sphereon/idk-oauth2-as | Authorization server handling login, consent, token issuance, and OIDC discovery. |
| OID4VCI Issuer | sphereon/idk-oid4vci-issuer | Credential issuer with offer creation, nonce, credential request, and deferred issuance endpoints. |
| OID4VP Verifier | sphereon/idk-oid4vp-verifier | Presentation verifier with authorization request creation, request object serving, and direct_post response handling. |
All containers communicate over an internal Docker network. Only Caddy exposes port 8080 to the host.
HTTPS Is Usually Required
Before you run the demo, decide how wallets will reach it. Most production wallets refuse to talk to HTTP issuers and verifiers. The OID4VCI / OID4VP specs allow http:// for loopback and localhost only, and in practice mobile wallets reject anything that isn't https:// with a trusted certificate. If you plan to test with a real wallet on a phone, you need TLS termination in front of the demo.
The demo itself does not run a TLS listener. Caddy is configured for plain HTTP on port 8080 because the CA, hostname, and ports would otherwise have to be pinned per developer. Terminate TLS externally and hand the demo your public https:// URL via the start.sh / start-dev.sh argument.
The easiest path during development is a tunnel service that gives you a public HTTPS hostname backed by a trusted cert:
ngrok:
# In one terminal: open a public HTTPS tunnel to localhost:8080
ngrok http 8080
# Forwarding: https://abc123.ngrok-free.app -> http://localhost:8080

# In another terminal: start the demo with that URL
cd examples/oid4vc/services
./start.sh https://abc123.ngrok-free.app
The URL becomes the EXTERNAL_BASE_URL everywhere: issuer identifier, AS issuer, VCT URIs, credential offer openid-credential-offer:// URIs embedded in QR codes. Wallets see a valid HTTPS URL with a cert they already trust, and all spec-level same-origin and issuer-identifier checks pass.
Other tunnel services that work the same way: Cloudflare Tunnel (cloudflared tunnel --url http://localhost:8080), localtunnel (lt --port 8080), Tailscale Funnel, or any reverse proxy in front of the demo (nginx, Caddy, Traefik) with a real cert from Let's Encrypt. Whichever you choose, the rule is the same: pass the public HTTPS URL to the start script as the first argument.
LAN IP (http://192.168.x.x:8080) works for a narrow subset of wallets and for bespoke dev wallets that allow HTTP. It is fine for exploring the flows with the built-in web wallet on the same machine, but as soon as you pull out a phone with a production wallet the HTTP URL will be rejected. Plan for HTTPS from the start, it avoids spending hours on "why doesn't my wallet load this offer" debugging.
Free ngrok URLs rotate every session. Use a reserved subdomain (ngrok http --hostname=myidk.ngrok-free.app 8080) or a Cloudflare Tunnel backed by your own domain so you don't have to re-issue QR codes and update VCT metadata on every demo run. The start scripts re-template vct/resolved/*.json with whatever URL you pass, so changing domains mid-session is safe, but any credentials already issued against the old URL will fail the VCT fetch on next wallet sync.
Running the Demo
There are two entrypoints. Pick the one that matches your situation:
| Script | Purpose | Requires IDK source? | Builds images? | Pulls from Docker Hub? |
|---|---|---|---|---|
start.sh / start.bat | Run published sphereon/idk-* images | no | no | yes (docker compose pull) |
start-dev.sh / start-dev.bat | Iterate on local IDK source | yes | yes (via docker compose up --build) | no |
build-images.sh / .bat | Build release-candidate images locally | yes | yes | no |
publish-images.sh / .bat | Push release images to a registry | yes | pushes pre-built tags | push |
End-users / demos (published images):
cd examples/oid4vc/services
./start.sh https://abc123.ngrok-free.app     # Recommended: public HTTPS URL
IDK_VERSION=0.25.0 ./start.sh https://...    # Pin a specific release
./start.sh                                   # Fallback: auto-detect LAN IP (HTTP only, most wallets reject)
start.sh resolves IDK_VERSION from (1) the environment, (2) vdx/edk/idk/gradle.properties version= if the source tree is present, (3) latest. It does not run Gradle, so an end-user can clone just the examples/oid4vc/services/ directory plus the IDK source checkout is optional.
Contributors iterating on IDK source (local build):
cd examples/oid4vc/services
./start-dev.sh
start-dev.sh runs Gradle to rebuild fat JARs, generates keystores, templates VCTs, and does docker compose up -d --build, so every change you make to IDK source becomes a new image on the next run. Image tags produced: sphereon/idk-<svc>:<IDK_VERSION> plus :latest.
Both scripts:
- Resolve
EXTERNAL_BASE_URLfrom (in order) the first positional argument, theEXTERNAL_BASE_URLenv var, or LAN IP auto-detection. For anything beyond local-machine testing, pass a publichttps://URL (see HTTPS Is Usually Required). - Generate PKCS12 keystores with EC P-256 signing keys (pre-seeded aliases
TestCredential,PID,AgeOver18,oauth2-server-signing,oid4vp-verifier-signing) via shared helpers inlib/. - Template VCT type metadata with the resolved external URL (safeguards against a silent sed failure that would otherwise produce stale
vct/resolved/*.json; see the script comments). - Write a
.envfile (EXTERNAL_BASE_URL,IDK_VERSION) consumed bydocker-compose.yaml. - Bring up the Caddy + four IDK containers.
Once running:
- Open
http://<your-ip>:8080in a browser (Caddy redirects/to/webapp/issuer) - Issuer identifier:
http://<your-ip>:8080/oid4vci - Issuer metadata (RFC 8615 insert form):
http://<your-ip>:8080/.well-known/openid-credential-issuer/oid4vci - OAuth2 AS issuer:
http://<your-ip>:8080/auth - AS discovery:
http://<your-ip>:8080/.well-known/oauth-authorization-server/auth
The EXTERNAL_BASE_URL matters because wallets on other devices (phones) need to reach the demo over the network, not via localhost, and for almost all production wallets that reach must be over HTTPS, so this is typically a tunnel URL like https://abc123.ngrok-free.app rather than a LAN IP.
Versioning
Docker image tags track IDK's own version from vdx/edk/idk/gradle.properties (version=...). There is no separate example version: a release of IDK becomes an image release of the four services (sphereon/idk-oauth2-as, sphereon/idk-oid4vci-issuer, sphereon/idk-oid4vp-verifier, sphereon/idk-oid4vc-webapp).
IDK_VERSION resolution order used by both start scripts:
IDK_VERSIONenvironment variable (explicit override).vdx/edk/idk/gradle.propertiesversion=field, when the IDK source tree is available next toexamples/.latest(with a warning) when neither is present.
Building and Publishing Images
If you are packaging a release of the example for distribution, use build-images.sh and publish-images.sh rather than driving docker push directly. They handle version resolution, three-tag tagging (:<IDK_VERSION>, :latest, :<git-sha>), and publish-time safety checks.
Build images without starting anything:
cd examples/oid4vc/services
./build-images.sh                        # sphereon/idk-* (default registry)
REGISTRY=ghcr.io/sphereon ./build-images.sh   # private registry
The default registry prefix is sphereon on Docker Hub. Override with REGISTRY (any path prefix works: ghcr.io/myorg, myregistry.example.com/team, etc.). The version comes from vdx/edk/idk/gradle.properties, so there is no separate version string to maintain.
Push images to a registry:
docker login docker.io

./publish-images.sh                      # Release build
./publish-images.sh --allow-snapshot     # Internal preview of a SNAPSHOT
./publish-images.sh --dirty              # Allow uncommitted changes in the tree
REGISTRY=ghcr.io/sphereon ./publish-images.sh
Safety defaults:
- Refuses to push a
*-SNAPSHOTversion unless--allow-snapshotis passed. - Refuses to push if the IDK source tree has uncommitted changes unless
--dirtyis passed. :latestis only pushed for non-SNAPSHOT releases, so the stable tag is not polluted by preview builds. Per-version and git-SHA tags are always pushed.
Image names published: sphereon/idk-oauth2-as, sphereon/idk-oid4vci-issuer, sphereon/idk-oid4vp-verifier, sphereon/idk-oid4vc-webapp.
Caddy Reverse Proxy
Caddy routes incoming requests by path prefix:
| Path | Destination |
|---|---|
/ (and /webapp, /webapp/) | Redirects to /webapp/issuer |
/webapp/* | Webapp container (React SPA + API), /webapp prefix stripped |
/assets/* | Static assets (logos, backgrounds) served by Caddy |
/oid4vci/vct/* | Static VCT metadata JSON served by Caddy |
/oid4vci/* | OID4VCI Issuer (protocol + backend routes) |
/.well-known/openid-credential-issuer/oid4vci | OID4VCI Issuer (RFC 8615 insert form, spec-correct) |
/oid4vci/.well-known/openid-credential-issuer | OID4VCI Issuer (pre-1.0 append form, compatibility) |
/.well-known/jwt-vc-issuer, /.well-known/jwt-vc-issuer/oid4vci | OID4VCI Issuer (SD-JWT VC issuer metadata) |
/oid4vp/* | OID4VP Verifier |
/auth/* | OAuth2 AS (login, authorize, token, etc.), /auth prefix stripped |
/.well-known/oauth-authorization-server/auth | OAuth2 AS (RFC 8414 insert form) |
/.well-known/openid-configuration/auth | OAuth2 AS (OIDC Discovery insert form) |
/.well-known/oauth-authorization-server, /.well-known/openid-configuration | OAuth2 AS (root fallback) |
/.well-known/jwks.json | OAuth2 AS (JWT access token verification keys) |
All services share a single external hostname and port. The issuer is path-scoped at /oid4vci and the OAuth2 AS at /auth, so their well-known metadata follows the RFC 8615 / RFC 8414 insert form. Wallets see one server; the services are isolated internally.
What Happens When You Run It
The breakdown differs slightly by entrypoint:
start-dev.sh (local build):
- Gradle builds fat JARs for the OAuth2 AS, OID4VCI issuer, OID4VP verifier, and webapp.
- PKCS12 keystores are generated with EC P-256 signing keys (one per service, pre-seeded aliases like
TestCredential,PID,AgeOver18for the issuer). docker compose up -d --buildbuilds each image fromDockerfile.serviceusing the fresh JARs, tagging themsphereon/idk-<svc>:<IDK_VERSION>and:latest.- Caddy waits for all services to become healthy, then starts accepting connections on port 8080.
start.sh (published images):
- PKCS12 keystores are generated if they do not already exist (keystores persist across runs).
docker compose pullfetchessphereon/idk-*:${IDK_VERSION}from Docker Hub.docker compose up -dstarts the containers without rebuilding.- Caddy waits for health checks, then opens port 8080.
In both cases, open http://<your-ip>:8080 in a browser. Caddy redirects / to /webapp/issuer.
If any port is already in use, the server will fail to bind and print an error. Stop the conflicting process or change the port in the configuration (see Configuration below).
Issuance Flow
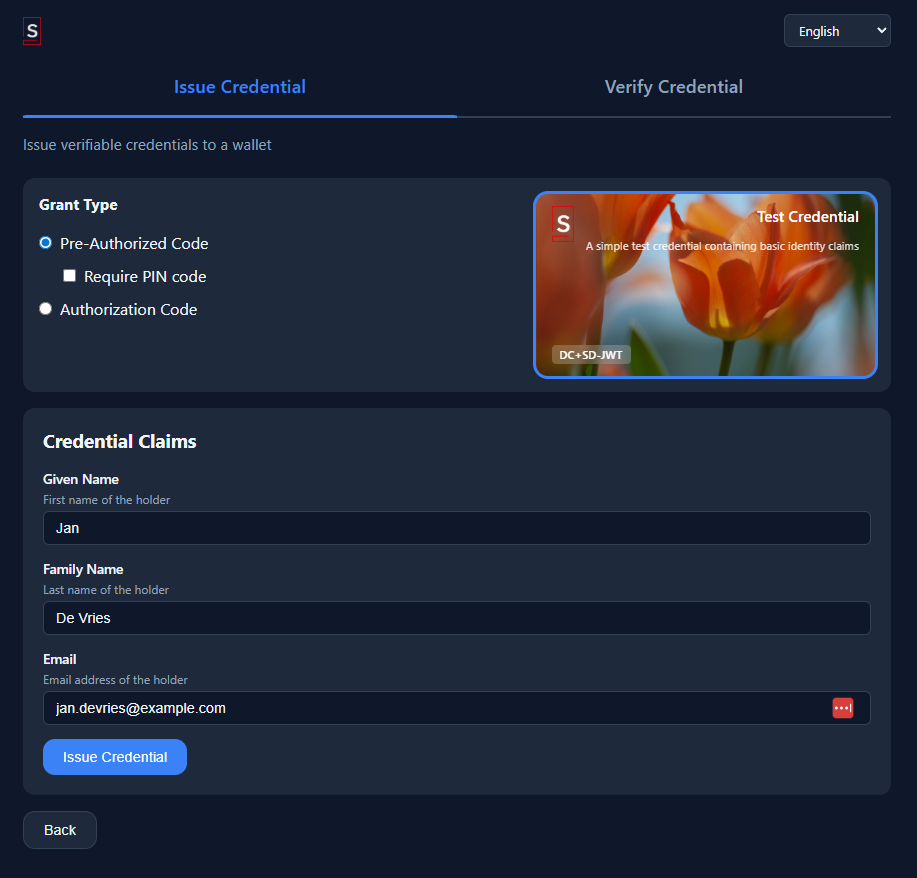
The demo walks through a full OID4VCI credential issuance. Here is what happens step by step as you use it:
-
Create a credential offer. On the issuer page, select a credential type (for example,
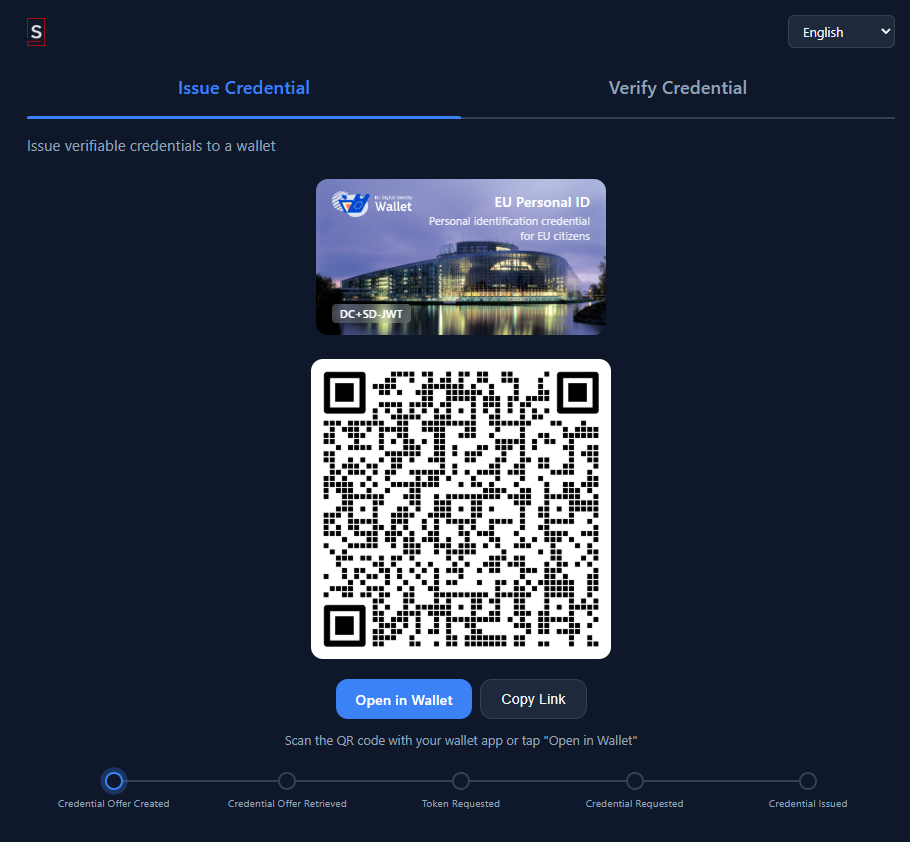
IdentityCredentialorUniversityDegree). The issuer callscreateCredentialOffer()with the selected credential configuration ID and generates a pre-authorized code grant. The result is anopenid-credential-offer://URI. -
Display the offer. The frontend renders the offer URI as a QR code. In a production deployment, a mobile wallet would scan this QR code. In the demo, the web frontend also shows a clickable link so you can proceed without a phone.
-
Resolve issuer metadata. When the holder (simulated by the demo's built-in wallet page) receives the offer, it fetches the issuer's
.well-known/openid-credential-issuermetadata to discover available credential configurations, supported formats, proof types, and the authorization server URL. -
Exchange the pre-authorized code for an access token. The holder sends the pre-authorized code to the OAuth2 token endpoint. If the offer requires a transaction code (PIN), the user enters it first. The authorization server validates the code, issues an access token (with optional DPoP binding), and returns it to the holder.
-
Request the credential. The holder creates a proof-of-possession JWT, binding the credential to its key pair, and sends a credential request to the issuer's
/credentialendpoint with the access token. The issuer validates the token, verifies the proof, resolves the credential attributes from its configuredCredentialAttributeContributor, and signs the credential using the appropriate format handler. -
Receive the credential. The issuer returns the signed credential (SD-JWT, mDoc, or JWT VC depending on the configuration). The demo displays the raw credential and its decoded claims in the browser.
Verification Flow
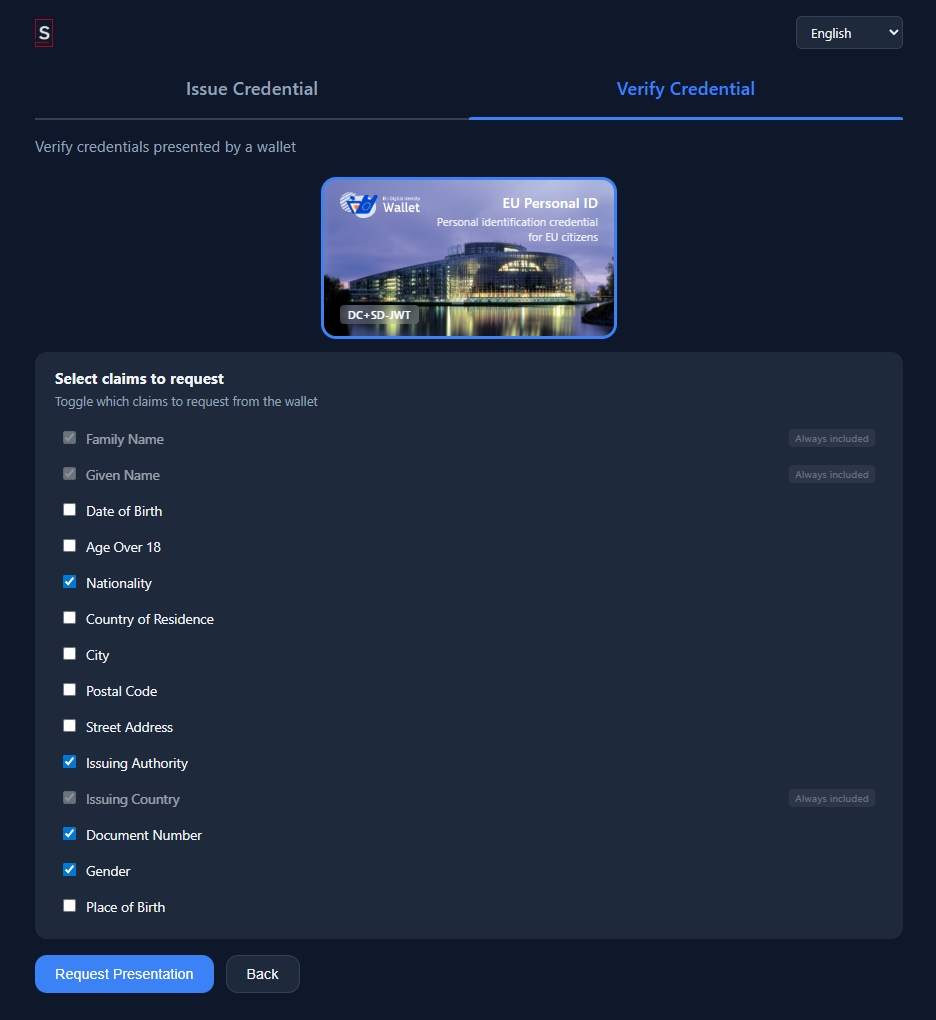
After issuance, the demo lets you verify the credential through OID4VP:
-
Create an authorization request. On the verifier page, select which claims you want to verify. The verifier builds a DCQL query specifying the credential format, document type, and required claims. It calls
createAuthorizationRequest()withdirect_postresponse mode and generates anopenid4vp://URI containing the request. -
Display the request. The frontend renders the authorization request URI as a QR code. As with issuance, the demo also provides a clickable link for same-device testing.
-
Select credentials to present. The holder (the demo's wallet page) parses the authorization request, matches it against held credentials, and shows the user which credentials satisfy the query and which claims will be disclosed. The user selects which credential to present.
-
Submit the presentation. The holder creates a verifiable presentation containing the selected credential with only the requested claims disclosed (using selective disclosure for SD-JWT or IssuerAuth namespaces for mDoc). It POSTs the
vp_tokenandstateto the verifier'sdirect_postendpoint. -
Validate the presentation. The verifier parses the response, validates it against the original DCQL query, checks that the nonce matches, and verifies holder binding (proving the presenter holds the private key the credential was bound to). The result includes the disclosed claims and the verification status.
-
View the result. The demo displays whether verification succeeded, which claims were disclosed, and the details of the holder binding check (signature validity, nonce match, audience match).
Configuration
The demo uses the IDK's layered configuration system. Each service has its own YAML config file in services/config/, and a small set of environment variables supply the values that differ per deployment (hostname, keystore password, internal client secret). Environment variables override anything in the file, and ${env:NAME} placeholders inside the YAML are resolved from the process environment at startup.
There are three service config files, one per container: oid4vci-issuer.yml, oid4vp-verifier.yml, and oauth2-as.yml. All three share a common top-level block for the HTTP server and the KMS provider, and then carry their own service-specific section.
Shared blocks
Every service binds a REST port and loads a PKCS12 keystore from the path mounted into the container:
server:
  rest:
    port: 8080
    auth:
      enabled: false
      anonymous:
        allowed: true

kms:
  providers:
    software:
      type: software
      enabled: true
      keystore:
        type: pkcs12
        id: software
        password: "${env:KEYSTORE_PASSWORD}"
        path: /app/keystore/keystore.p12
Auth is disabled in the demo so you can exercise the flows without a frontdoor login. Real deployments flip auth.enabled on and wire in OIDC. The keystore is generated by start.sh with pre-seeded aliases (TestCredential, PID, AgeOver18, oid4vp-verifier-signing) that the other configuration blocks reference by name.
Issuer (oid4vci-issuer.yml)
The issuer defines its identity, the authorization server it trusts for tokens, and one entry per credential it can issue:
oid4vci:
  issuer:
    identifier: "${env:EXTERNAL_BASE_URL}/oid4vci"
    authorization-servers: "${env:EXTERNAL_BASE_URL}/auth"
    signing-key-alias: TestCredential
    credential-configuration-ids: TestCredential,EuPid,AgeOver18

    # Back-channel OAuth2 client credentials the issuer uses to call the AS
    # for token introspection and nonce validation.
    as-bridge:
      internal-url: "${env:OAUTH2_AS_INTERNAL_URL}"
      client-id: issuer-service
      client-secret: "${env:INTERNAL_CLIENT_SECRET}"

    credentials:
      "[TestCredential]":
        format: "dc+sd-jwt"
        vct: "${env:EXTERNAL_BASE_URL}/oid4vci/vct/TestCredential"
        scope: test_credential
        signing-key-alias: TestCredential
        signing-key-mode: "did:jwk"
        signing-algorithms: ES256
        expiration-in-days: 365
        binding-methods: jwk,did:jwk,did:key
        proof-types:
          jwt:
            signing-algorithms: ES256
        claims:
          given_name: { mandatory: false }
          family_name: { mandatory: false }
          email: { mandatory: true }

      "[AgeOver18]":
        format: "mso_mdoc"
        doctype: "eu.europa.ec.av.1"
        scope: age_verification
        signing-key-alias: AgeOver18
        signing-algorithms: ES256
        expiration-in-days: 365
        binding-methods: cose_key
        claims:
          age_over_18: { mandatory: true }

  rest:
    external-base-url: "${env:EXTERNAL_BASE_URL}"
identifier and authorization-servers are resolved from EXTERNAL_BASE_URL so the service graph reaches the same hostname the wallet does; mixing up internal and external URLs is the most common cause of metadata mismatch errors in OID4VCI. signing-key-alias at the issuer level names the key used to sign issuer metadata (OID4VCI §13.2.4), while each credential entry can pin its own signing key to rotate them independently. signing-key-mode: did:jwk drives how the signing key identifies itself in JOSE headers; the binding-methods list declares what the holder side may bind to (for SD-JWT: raw JWK and DID-based, for mDoc: COSE keys). as-bridge is the back-channel the issuer uses to talk to the AS for token validation, using client_credentials against a registered internal client. The demo ships with three credential configurations (one SD-JWT, one EU PID SD-JWT, one mDoc age attestation) to exercise both mainstream formats.
Credential configuration IDs are wrapped in square brackets ([TestCredential]) so the IDK's key normalizer treats them as literal map keys rather than folding the CamelCase into dotted segments. See Literal Key Segments for the underlying rule.
Verifier (oid4vp-verifier.yml)
The verifier declares its external base URL, the response endpoint wallets should POST presentations back to, and how it signs JAR (JWT-secured) authorization requests:
oid4vp:
  universal:
    external-base-url: "${env:EXTERNAL_BASE_URL}"
    response-uri: "${env:EXTERNAL_BASE_URL}/oid4vp/auth/response"
  verifier:
    request-object:
      signing:
        enabled: true
        key-alias: oid4vp-verifier-signing
        mode: "did:jwk"            # or x509_san_dns, x509_hash
        include-iss: false
        audience: "https://self-issued.me/v2"
        expiration-seconds: 300
The verifier has no explicit client-id. It is derived from mode per OID4VP §5.9.3 (Client Identifier Prefixes): did:jwk yields a decentralized_identifier:<did> prefix and puts the DID verification method URL in the JOSE kid; x509_san_dns requires a matching san-dns-name entry and takes the x5c chain from the KMS key; x509_hash pins a SHA-256 of the leaf cert as a trust anchor. The demo uses did:jwk because it works out of the box from any key without certificate plumbing. include-iss defaults to false (spec-correct, §5.10 lists iss as SHOULD not MUST) and can be flipped on for older wallets that still require it. audience is the wallet-side audience claim on the signed request; expiration-seconds bounds the request object validity window.
Authorization server (oauth2-as.yml)
The AS runs in hosted mode with PKCE mandatory and JWT access tokens:
oauth2:
  servers:
    default:
      mode: HOSTED
      issuer: "${env:EXTERNAL_BASE_URL}/auth"
      oidc: SUPPORTED
      pkce: REQUIRED
      token-format: JWT
      access-token-lifetime-seconds: 3600
      authorization-code-lifetime-seconds: 600
      grant-types-enabled: "authorization_code,urn:ietf:params:oauth:grant-type:pre-authorized_code,client_credentials,refresh_token"
      public-clients:
        allow-any: true
      internal-clients:
        issuer:
          client-id: issuer-service
          client-secret: "${env:INTERNAL_CLIENT_SECRET}"
mode: HOSTED means the IDK runs the AS in-process: it serves the full authorization, token, and discovery endpoints itself. The alternative, EXTERNAL, makes the IDK act as an OAuth2 client against a separately deployed AS (in that case the endpoint overrides and client credentials under oauth2.servers.default apply instead). pkce: REQUIRED rejects public-client flows that omit the code challenge, which is the correct default for anything that will run on a mobile wallet. The four grant types enabled cover: the user-facing authorization code flow (wallet via browser), the OID4VCI pre-authorized code flow (scanned from a QR), the back-channel client-credentials flow (the issuer calls the AS, matching as-bridge above), and refresh tokens. public-clients.allow-any: true is a demo convenience: any client_id is accepted as a public client. Production deployments switch this off and register clients explicitly. internal-clients.issuer is the only registered confidential client, used by the issuer service to authenticate its AS calls.
Environment variables
The demo reads five environment variables, and every ${env:...} reference in the YAML resolves to one of them:
| Variable | Used by | Purpose |
|---|---|---|
EXTERNAL_BASE_URL | all three | The hostname wallets and browsers reach (for example https://abc123.ngrok-free.app, or a LAN IP like http://192.168.1.10:8080 for HTTP-tolerant dev wallets). Issuer identifier, AS issuer, verifier base URL, and VCT URIs all hang off this. Production wallets require HTTPS (see HTTPS Is Usually Required). |
KEYSTORE_PASSWORD | all three | PKCS12 keystore password. Generated by start.sh. |
OAUTH2_AS_INTERNAL_URL | issuer | Docker-network URL the issuer uses to reach the AS back-channel. Usually http://oauth2-as:8080. |
INTERNAL_CLIENT_SECRET | issuer, AS | Shared secret between the issuer and the AS for client_credentials. Both sides must match. |
SERVER_REST_PORT | any | Overrides server.rest.port if you need a service on a different port. Rarely needed in the demo because Caddy hides the internals. |
Setting EXTERNAL_BASE_URL correctly is the one thing the demo script cares about. start.sh auto-detects a LAN IP as a fallback, but for anything beyond a same-machine web wallet you almost always want to pass a public HTTPS tunnel URL explicitly: ./start.sh https://abc123.ngrok-free.app. See HTTPS Is Usually Required for why, and Running the Demo for the resolution order.
End-to-End Tests
The e2e/ directory contains automated test scenarios that exercise the full issuance and verification flow programmatically. These tests start the services, perform the protocol exchanges, and assert on the results:
./gradlew :examples:oid4vc:e2e:test
The E2E tests are useful both as a validation tool and as additional code examples showing how to call the IDK services directly without the HTTP layer.
Extending the Demo
The demo is designed to be a starting point. Here are common modifications:
Adding a New Credential Type
Walk-through for an SD-JWT credential. Adapt step 2 for mso_mdoc (use doctype instead of vct, binding-methods: cose_key).
-
Create the VCT type metadata. Add
vct/MyNewCredential.jsondescribing the claims, top-level display, and per-claim display. Include every locale you want wallets to render; the shipped examples carryen-US,de-DE,es-ES,nl-NL,fr-FR,zh-CN,ja-JP. Wallets pick the best match for the user's preferred locale; a claim with no matching locale falls back to the first entry. Usevct/TestCredential.jsonas a template. The VCT URL must literally equal the URL the wallet fetches it from; the start scripts substituteEXTERNAL_BASE_URLinto thevctfield at boot, so reference it asEXTERNAL_BASE_URLin the source file and leave the resolved form to the templater. -
Add a credential configuration block to
config/oid4vci-issuer.ymlunderoid4vci.issuer.credentials. Note the literal-key bracket form; it prevents the IDK key normalizer from folding CamelCase into dotted segments:oid4vci:
issuer:
credential-configuration-ids: TestCredential,EuPid,AgeOver18,MyNewCredential
credentials:
"[MyNewCredential]":
format: "dc+sd-jwt"
vct: "${env:EXTERNAL_BASE_URL}/oid4vci/vct/MyNewCredential"
scope: my_credential
signing-key-alias: MyNewCredential
signing-key-mode: "did:jwk"
signing-algorithms: ES256
expiration-in-days: 365
binding-methods: jwk,did:jwk,did:key
proof-types:
jwt:
signing-algorithms: ES256
claims:
name: { mandatory: true }
age: { mandatory: false } -
Provision a signing key for the new credential. Append the alias to the
oid4vci-issuerkeystore generation inlib/generate-keystores.sh(andlib/generate-keystores.ps1for Windows parity):generate_keystore "oid4vci-issuer" "TestCredential" "PID" "AgeOver18" "MyNewCredential". If the keystore already exists the script skips it; deletekeystores/oid4vci-issuer/keystore.p12on first change, or add the alias viakeytool -importkeystoremanually. Re-usingsigning-key-alias: TestCredential(or any other existing alias) is also fine for a shared key. -
Implement a
CredentialAttributeContributorto return the claims at issuance time, or add static attributes to the offer using theattributesblock on the offer request. See Custom Claim Sources below. -
If you need a format not already covered by the built-in handlers (
dc+sd-jwt,mso_mdoc,jwt_vc_json), implement a customCredentialFormatHandlerand register it in the DI graph. -
Rebuild and restart. In dev:
./start-dev.shrebuilds the issuer image and picks up both the YAML change and the new VCT file. In published-image mode: you must republish the issuer image (or bind-mount the updatedconfig/directory; the compose file already does this foroid4vci-issuer.yml).
Custom Claim Sources
The demo uses a simple in-memory attribute contributor that returns hardcoded claims. To pull claims from an external system:
- Create a class implementing
CredentialAttributeContributor. - In its
contribute()method, query your user database, identity provider, or external API. - Register it with
@ContributesIntoSet(AppScope::class)so the issuer picks it up automatically. Multiple contributors can be registered; their results are merged.
Using a Real KMS
The demo uses the software KMS provider, which stores keys in memory. For production:
- AWS KMS: Add
lib-crypto-kms-provider-awsto your dependencies and configure the provider ID, region, and credentials. - Azure Key Vault: Add
lib-crypto-kms-provider-azureand configure the vault URL and authentication.
See the KMS Providers guide for configuration details.
Next Steps
- Services Overview: Details on the individual services used in the demo
- OID4VCI Issuer Guide: How credential issuance works under the hood
- OID4VP Verifier Guide: How presentation verification works
- Configuration: The layered configuration system used by the demo
- Application Setup: Defining your application graph and initializing the IDK